It’s more likely that by now you’ve already heard of OpenAI’s ChatGPT, Google’s Bard or Microsoft’s Bing. Although they are experimental software, “Generative AI” (as they are popularly known) are pretty useful.
One of the biggest problems with these programs is that they are restricted in their use. Using ChatGPT programmatically requires an API fee, as it has a limited free access. Bard’s API is currently in beta and only available to a select group of developers. So far, Bing does not offer a public API, although an unofficial API is available. These services all come with a lot of restrictions, even if you are able to access their APIs. They are mostly guardrails placed for safety and to avoid abuse of different kinds. For an uncontrolled environment like the internet, these protections are useful. Such limitations are unnecessary for researchers and corporate users.
The best way to avoid relying on 3rd party APIs is to install your own Generative AI. As of now, only a few options are available for local installation. The LLaMA model is one of these options.

Inference software such as llama.cpp is required to use these models. The purpose of this article is to describe how to install and use llama.cpp on a MacBook Pro with an M1 processor.
What you need:
- A MacBook Pro with M1 pro chip
- LLaMA models. You can request them to Meta AI here or find a torrent.
Let me give you an overview of the process before I get into the step-by-step guide:
A Python program and a C++ program are required. Python needs some CPU-specific dependencies, which is why you shouldn’t set your terminal to use Rosetta (more on that later). It is better to use Homebrew since you need a specific Python version. This package requires Xcode command line tools. Once you have Python and its dependencies, you’ll need the llama.cpp source code to compile it. When you have installed the LLaMA package, you must process the LLaMA model, and then you can start making inferences with llama.cpp.
Step by step guide:
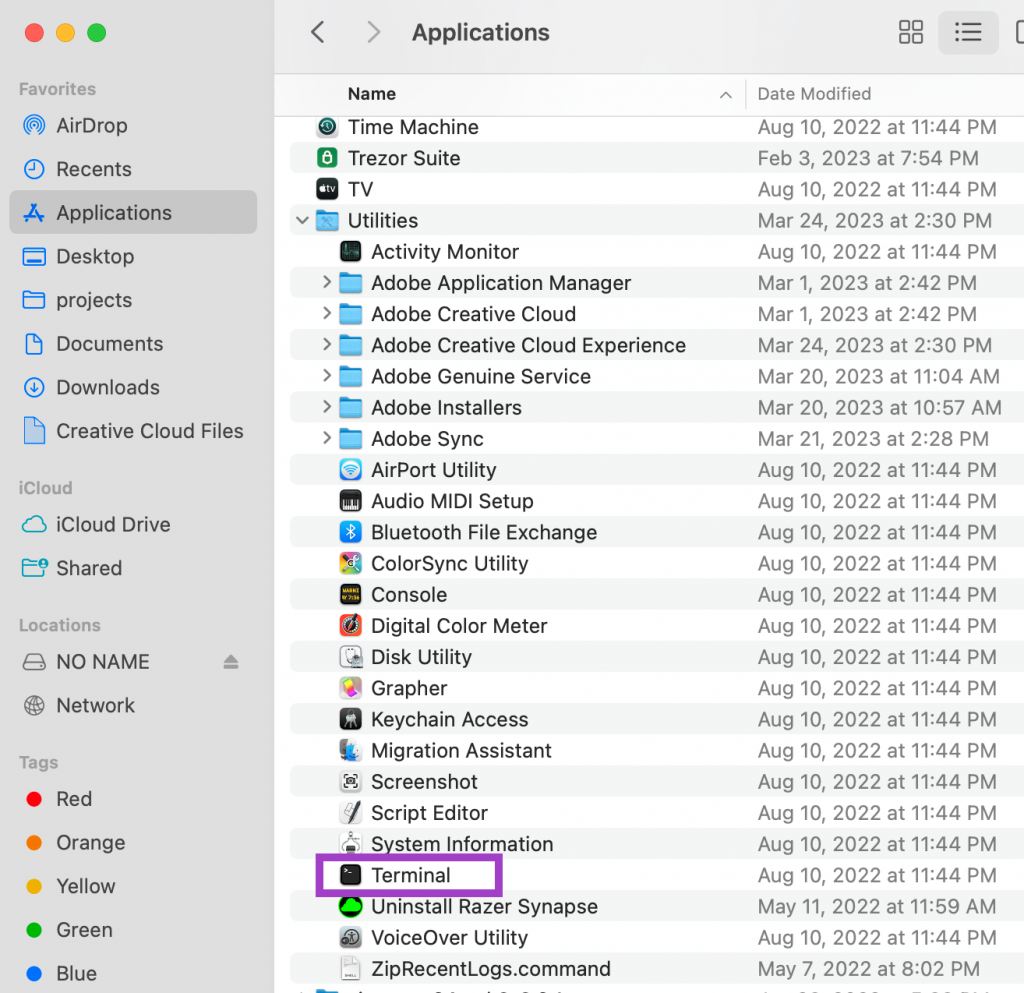
First thing is to make sure that the terminal you are using don’t have Rosetta activated. If you use the terminal that comes by default with macOS (it is called just “terminal”), go to Finder and click on Application, then look for Utilities, you will see the Terminal icon.
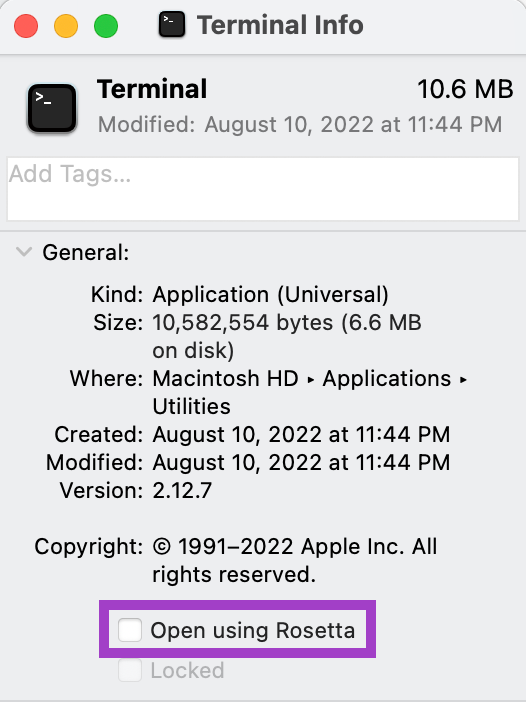
Click on it with the secondary mouse button and select Get Info, and make sure that the checkbox Open using Rosetta is not checked.
Install Command Line tools:
Open the terminal and install command line tools if not installed already:
% xcode-select --install
Install Homebrew
% /bin/bash -c "$(curl -fsSL https://raw.githubusercontent.com/Homebrew/install/HEAD/install.sh)"
Install pkgconfig, cmake and python 3.11.
Some tutorials recommend installing lower versions of Python, this is outdated, 3.11 has all the required packages now, so ignore this advice install this version.
% brew install pkgconfig cmake python@3.11
Once Python in installed, pay attention where it is installed, usually is in a place like /opt/homebrew/bin/python3.11. Now it time to create a virtual environment to install Python dependencies, in this case I call it venv311:
% /opt/homebrew/bin/python3.11 -m venv venv311
Activate the environment and install dependencies:
% . venv311/bin/activate(venv311) % pip3 install --pre sentencepiece torch torchvision --extra-index-url https://download.pytorch.org/whl/nightly/cpu
Run Python and the following command to make sure torch is installed correctly (you should see True if everything went OK)
(venv311) % python
Python 3.11.2 (main, Feb 16 2023, 02:55:59) [Clang 14.0.0 (clang-1400.0.29.202)] on darwin
Type "help", "copyright", "credits" or "license" for more information.
>>> import torch; torch.backends.mps.is_available()
True
Download the llama.cpp code from GitHub:
% git clone git@github.com:ggerganov/llama.cpp.git
Cloning into 'llama.cpp'…
Compile this code with make:
(venv311) % make
We have installed C++ and the Python code. It’s time to deal with the data. It is important to consider the location of the data first. It is divided into four folders: 7B, 13B, 30B, 65B (B refers to billions of parameters). It is expected that you will place these folders into the models directory in the llama.cpp directory. Alternatively, you can place it in another directory, in which case you must pass the directory in the following commands. Models come in pth format (machine learning models created with PyTorch), and you must convert them to an ggml format using convert-pth-to-ggml.py.
Let’s start with the 7B model:
% python convert-pth-to-ggml.py 7B/ 1
If the model is in the /Volumes/x/LLaMA/ folder, use:
python convert-pth-to-ggml.py /Volumes/x/LLaMA/7B/ 1
You should see something like this:
{'dim': 4096, 'multiple_of': 256, 'n_heads': 32, 'n_layers': 32, 'norm_eps': 1e-06, 'vocab_size': -1}
Namespace(dir_model='/Volumes/x/LLaMA/7B/', ftype=1, vocab_only=0)
n_parts = 1
Processing part 0
Processing variable: tok_embeddings.weight with shape: torch.Size([32000, 4096]) and type: torch.float16
Processing variable: norm.weight with shape: torch.Size([4096]) and type: torch.float16
  Converting to float32
Processing variable: output.weight with shape: torch.Size([32000, 4096]) and type: torch.float16
...
Processing variable: layers.31.feed_forward.w3.weight with shape: torch.Size([11008, 4096]) and type: torch.float16
Processing variable: layers.31.attention_norm.weight with shape: torch.Size([4096]) and type: torch.float16
  Converting to float32
Done. Output file: /Volumes/x/LLaMA/7B//ggml-model-f16.bin, (part 0)
Once this is finished, you should run the quantize step, with this command:
./quantize models/7B/ggml-model-f16.bin models/7B/ggml-model-q4_0.bin 2
If the models are in the /Volumes/x/LLaMA/7B/ directory, run:
./quantize /Volumes/x/LLaMA/7B/ggml-model-f16.bin /Volumes/x/LLaMA/7B/ggml-model-q4_0.bin 2
It should output something like this:
llama_model_quantize_internal: loading model from '/Volumes/x/LLaMA/7B/ggml-model-f16.bin'
llama_model_quantize_internal: n_vocab = 32000
llama_model_quantize_internal: n_ctx   = 512
llama_model_quantize_internal: n_embd  = 4096
llama_model_quantize_internal: n_mult  = 256
llama_model_quantize_internal: n_head  = 32
llama_model_quantize_internal: n_layer = 32
llama_model_quantize_internal: f16     = 1
    tok_embeddings.weight - [ 4096, 32000], type =    f16 quantizing .. size =   500.00 MB ->    78.12 MB | hist: 0.000 0.022 0.019 0.033 0.053 0.078 0.104 0.125 0.133 0.125 0.104 0.078 0.053 0.033 0.019 0.022
   norm.weight - [ 4096,     1], type =    f32 size =    0.016 MB
...
2 0.077 0.104 0.125 0.134 0.125 0.104 0.078 0.053 0.033 0.019 0.022
  layers.31.attention_norm.weight - [ 4096,     1], type =    f32 size =    0.016 MB
  layers.31.ffn_norm.weight - [ 4096,     1], type =    f32 size =    0.016 MB
llama_model_quantize_internal: model size  = 25705.02 MB
llama_model_quantize_internal: quant size  =  4017.27 MB
llama_model_quantize_internal: hist: 0.000 0.022 0.019 0.033 0.053 0.078 0.104 0.125 0.134 0.125 0.104 0.078 0.053 0.033 0.019 0.022
main: quantize time = 178172.00 ms
main:    total time = 178172.00 ms
This finishes the installation of the 7B model.
Let’s try the 7B model (you may need about 8Gb of RAM to run this inference):
./main -m /Volumes/x/LLaMA/7B/ggml-model-q4_0.bin -t 8 -n 128 -p 'Hello world'
Transforming larger models
For larger models (like 13B), the process is slightly different. The first step is the same, but it will generate more files, and you will need to run the second step multiple times. The first step:
python convert-pth-to-ggml.py /Volumes/x/LLaMA/13B/ 1
(Note that this will create ggml-model-f16.bin and ggml-model-f16.bin.1)
Using these files you should run these commands:
./quantize /Volumes/x/LLaMA/13B/ggml-model-f16.bin /Volumes/x/LLaMA/13B/ggml-model-q4_0.bin 2
./quantize /Volumes/x/LLaMA/13B/ggml-model-f16.bin.1 /Volumes/x/LLaMA/13B/ggml-model-q4_0.bin.1 2
Conclusion
If everything went well, you should be the models ready to use and you should start focusing on learning how to use it in an effective way. Here are some pointers for further reading:
- LLaMA by Meta AI: https://ai.facebook.com/blog/large-language-model-llama-meta-ai/
- Alternative way to run LLaMA: https://levelup.gitconnected.com/how-to-run-your-own-llama-550cd69b1bc9
- Vicuña: https://vicuna.lmsys.org/